DIY cabinet drawers offer a rewarding way to personalize your kitchen, bathroom, or any space with custom storage solutions. From selecting the right materials to mastering essential woodworking techniques, this guide empowers you to build drawers that meet your specific needs and aesthetic preferences.
Table of Contents
Whether you’re a seasoned woodworker or a beginner eager to learn, this comprehensive guide provides step-by-step instructions and valuable insights for creating durable and functional DIY cabinet drawers.
Types of DIY Cabinet Drawers
Building your own cabinet drawers can be a rewarding experience, offering the opportunity to customize them to your exact needs and preferences. The choice of materials for your drawer construction will significantly impact the final outcome, both aesthetically and functionally.
Materials Used for DIY Cabinet Drawers
The materials used for DIY cabinet drawers play a crucial role in their overall performance, appearance, and cost. Here’s a breakdown of common options:
- Wood: Solid wood is a classic choice for cabinet drawers, offering durability, natural beauty, and a timeless appeal. Common wood species include oak, maple, cherry, and pine, each with its own distinct grain pattern and color. Wood is relatively easy to work with, allowing for intricate designs and finishes. However, it can be expensive, prone to warping or cracking, and requires proper care to prevent damage.
- Plywood: Plywood is a layered wood product composed of thin veneers glued together with alternating grain directions. This construction method provides greater stability and resistance to warping compared to solid wood. Plywood is also more affordable than solid wood and readily available in various thicknesses. While it offers good strength, it may not be as aesthetically pleasing as solid wood.
- MDF (Medium-Density Fiberboard): MDF is an engineered wood product made from wood fibers that are bonded together with resin. It is known for its smooth surface, consistent density, and affordability. MDF is easy to cut and shape, making it suitable for complex designs. However, it is less durable than solid wood or plywood, prone to moisture damage, and may release harmful formaldehyde fumes.
- Metal: Metal, typically steel or aluminum, is a durable and long-lasting option for cabinet drawers. Metal drawers are resistant to moisture, scratches, and dents. They are also often lighter than wood drawers, making them easier to slide. However, metal can be more expensive than wood and may require specialized tools for fabrication.
Drawer Construction Methods
The choice of construction method will determine the strength, stability, and appearance of your DIY cabinet drawers. Popular methods include:
- Dovetail Joints: Dovetail joints are considered the strongest and most aesthetically pleasing type of joint. They are created by interlocking tapered pins (tails) and slots (pins) in a precise, interlocking pattern. While they require specialized tools and skill to create, they offer exceptional strength and durability.
- Box Joints: Box joints, also known as finger joints, are formed by interleaving a series of rectangular “fingers” on two pieces of wood. They provide good strength and are relatively easy to create using a table saw or router. Box joints are less intricate than dovetail joints but still offer a clean and professional look.
- Rabbet Joints: Rabbet joints are simple and efficient, created by cutting a rectangular groove (rabbet) into one piece of wood and fitting another piece into the groove. They are often used for drawer fronts and sides, providing a sturdy and secure connection. While they may not be as visually appealing as dovetail or box joints, they are easy to create and offer good strength.
Essential Tools and Equipment
Building DIY cabinet drawers requires a collection of essential tools and equipment. These tools are categorized based on their function, allowing for efficient and effective drawer construction.
Cutting Tools
Cutting tools are crucial for shaping and sizing the drawer components. They enable precise cuts for a professional finish.
- Table Saw: A table saw is used for making accurate crosscuts and rip cuts on plywood or hardwood sheets. It features a circular saw blade mounted on a table, allowing for precise cuts along a guide fence.
- Circular Saw: A circular saw is a portable power tool used for making straight cuts in wood, plywood, and other materials. It is equipped with a circular blade that rotates at high speed, making it suitable for cutting large sheets and shaping edges.
- Jigsaw: A jigsaw is a versatile tool used for making curved and intricate cuts in wood. It uses a reciprocating blade that moves up and down, allowing for precise cuts along complex shapes.
- Hand Saw: A hand saw is a traditional tool used for making straight cuts in wood. It is a manual tool that requires a bit of skill and practice to achieve precise cuts.
Drilling Tools
Drilling tools are essential for creating holes in wood for assembling drawer components. They ensure secure fastening and prevent splitting.
- Drill/Driver: A drill/driver is a versatile power tool used for drilling holes and driving screws. It features a chuck that holds drill bits and screwdriver bits, allowing for various tasks.
- Drill Press: A drill press is a stationary tool used for drilling holes in wood with precision and accuracy. It uses a vertical drill bit that is lowered into the workpiece, ensuring consistent depth and straight holes.
- Countersinking Drill Bit: A countersinking drill bit is used to create a countersink in wood, which is a beveled hole that allows for the screw head to sit flush with the surface. This prevents the screw head from protruding and creating an uneven surface.
Assembling Tools
Assembling tools are crucial for joining and securing drawer components. They ensure a strong and durable drawer structure.
- Clamps: Clamps are used to hold wood pieces together while glue dries or screws are being driven. They provide pressure and alignment, ensuring a strong and secure joint.
- Screwdriver: A screwdriver is used for driving screws into wood, securing drawer components together. It comes in various sizes and types to fit different screw heads.
- Wood Glue: Wood glue is a strong adhesive used to bond wood pieces together. It is essential for creating strong and durable joints, especially for cabinet drawers.
- Pocket Hole Jig: A pocket hole jig is used to create angled holes in wood, allowing for screws to be driven from the side of the workpiece. This provides a strong and hidden joint, ideal for cabinet drawers.
Finishing Tools
Finishing tools are used to enhance the appearance and durability of the drawer. They ensure a smooth and protective finish.
- Sandpaper: Sandpaper is used to smooth the surface of wood, removing imperfections and creating a smooth finish. It comes in various grits, with finer grits used for final sanding.
- Random Orbit Sander: A random orbit sander is a power tool used for sanding wood surfaces quickly and efficiently. It uses a random orbital motion to prevent sanding marks and create a smooth finish.
- Wood Stain: Wood stain is a liquid that penetrates the surface of wood, changing its color and enhancing its grain pattern. It provides a natural and beautiful finish.
- Polyurethane Finish: Polyurethane finish is a clear coating that protects wood surfaces from scratches, water damage, and other wear and tear. It provides a durable and long-lasting finish.
Measuring Tools
Measuring tools are essential for accurate and precise measurements during drawer construction. They ensure proper sizing and alignment.
- Tape Measure: A tape measure is used to measure the length, width, and depth of drawer components. It is a basic tool used for all woodworking projects.
- Speed Square: A speed square is a versatile tool used for measuring angles and making precise cuts. It is a must-have for cabinet drawer construction.
- Combination Square: A combination square is a tool used for measuring lengths, angles, and drawing lines. It is a versatile tool used for various woodworking tasks.
Planning and Design
Before you start building your DIY cabinet drawers, it’s crucial to plan and design them carefully. This ensures that your drawers fit perfectly, function smoothly, and are built to last.
Measuring and Planning Dimensions
Accurate measurements are essential for creating well-fitting drawers. Here’s a breakdown of the key measurements to consider:
* Drawer Size: Determine the overall width and height of the drawer opening. This will dictate the dimensions of the drawer box.
* Drawer Depth: Measure the depth of the cabinet opening. This will determine the depth of the drawer box and the length of the drawer slides.
* Drawer Opening: Measure the height of the cabinet opening to ensure the drawer will fully extend without hitting the bottom of the cabinet.
Creating a Detailed Drawing
A detailed drawing or sketch of your drawer design is invaluable for visualization and accuracy. It helps you to:
* Visualize the Drawer: A drawing allows you to see how the drawer will fit within the cabinet and how the different components will come together.
* Determine Materials: You can use your drawing to calculate the amount of wood and hardware needed for the project.
* Identify Potential Issues: By visualizing the drawer design, you can identify any potential problems before you start building, such as insufficient clearance or improper joinery.
Calculating Materials and Hardware
Once you have a detailed drawing, you can calculate the materials and hardware needed for your drawer project.
* Wood: Determine the type of wood you will use for the drawer box and the drawer front. Consider factors like durability, appearance, and cost.
* Drawer Slides: Choose the appropriate type and length of drawer slides based on the weight of the drawer and the depth of the cabinet opening.
* Hardware: Calculate the amount of screws, nails, glue, and other hardware needed for the project.
Cutting and Shaping: Diy Cabinet Drawers
Now that you have your drawer plans in place, it’s time to get your hands dirty and start cutting and shaping your drawer components. This section will guide you through the process, explaining how to use various tools and techniques for precise cuts and creating different drawer shapes.
Cutting Drawer Components
You’ll need a combination of tools to cut your drawer components to size, depending on the materials you’re using and the complexity of your design. Here’s a breakdown of the most common tools and techniques:
- Table Saw: For making accurate, straight cuts in plywood or solid wood, a table saw is essential. It provides a stable platform and a precise blade guide, making it ideal for cutting drawer sides, bottoms, and fronts.
- Miter Saw: A miter saw is perfect for making angled cuts, especially when creating drawer fronts with decorative moldings or when joining drawer components at 45-degree angles.
- Circular Saw: A circular saw is a versatile tool that can be used for cutting both straight and curved lines. It’s particularly useful for cutting large sheets of plywood or when you need to make cuts on site.
- Jigsaw: A jigsaw is essential for making intricate cuts, especially when working with curved or irregular shapes. It’s ideal for creating rounded corners, decorative cutouts, or complex designs on drawer fronts.
Tip: Always use a sharp blade and make sure your saw is properly aligned before making any cuts. Use a push stick for safety when working with a table saw or circular saw.
Creating Drawer Shapes and Profiles
Once you’ve cut your drawer components to size, you can add decorative touches or create specific shapes and profiles using a router.
- Rounded Corners: A router can be used to create smooth, rounded corners on drawer fronts, giving them a more finished look. Use a roundover bit to create a subtle curve, or a cove bit for a more pronounced rounded edge.
- Curved Edges: For more elaborate designs, a router can be used to create curved edges on drawer fronts or sides. Use a template to guide the router and achieve a consistent shape.
- Raised Panels: You can use a router to create raised panels on drawer fronts, adding visual interest and dimension. This involves cutting a recess in the drawer front and then raising the center panel.
- Moldings: A router can also be used to create various moldings on drawer fronts, such as decorative edges, fillets, or ogees. This adds detail and elegance to your drawers.
Tip: When using a router, always use a template or a fence to ensure precise and consistent results. Start with a light cut and gradually increase the depth until you achieve the desired shape.
Assembling the Drawer Box
With your drawer pieces cut and shaped, it’s time to bring them together to form the sturdy foundation of your cabinet drawers. This process involves joining the drawer sides, securing the bottom, and incorporating the drawer slides. The techniques you choose will impact the durability and overall quality of your drawers.
Joining the Drawer Sides
Joining the drawer sides involves creating a strong, stable framework that can support the weight of the drawer contents. This is typically done by attaching the sides to the front and back pieces.
- Using Glue: Wood glue is a reliable and readily available option for joining drawer sides. Apply a thin, even layer of glue along the edges that will be joined. Ensure the surfaces are clean and free of debris before applying glue. Clamp the pieces together, applying pressure to ensure a strong bond. Allow the glue to dry completely before proceeding.
- Using Screws: Screws offer additional strength and can be used alone or in conjunction with glue. Pre-drill pilot holes to prevent wood splitting. Countersink the screw heads for a flush finish.
- Using Dowels: Dowels are cylindrical pieces of wood that are inserted into pre-drilled holes in the drawer sides. They provide a strong and stable joint, and are particularly effective for aligning the sides precisely.
- Using Pocket Holes: Pocket holes are angled holes drilled into the edge of the drawer sides. Screws are then driven into these holes, creating a strong and hidden joint. Pocket hole jigs are available to make the process easier and more accurate.
Finishing and Hardware
The final steps in building your DIY cabinet drawers involve adding the finishing touches that will make them both functional and aesthetically pleasing. This includes applying a protective coating and choosing the right hardware to complete the look.
Finishing Techniques
The finishing techniques you choose for your drawers will depend on the desired look and the material used. Here are some common options:
- Sanding: Sanding is essential to create a smooth surface for painting or staining. Use progressively finer grits of sandpaper to achieve a smooth, even finish. Start with a coarse grit to remove imperfections, then work your way up to a fine grit for a smooth finish.
- Staining: Staining adds color and depth to the wood, highlighting its natural grain patterns. Choose a stain color that complements the overall design of your cabinets. Apply stain evenly with a brush or cloth, and wipe away excess stain to prevent blotching.
- Painting: Painting provides a smooth, uniform finish and allows for a wide range of colors. Choose a paint that is specifically designed for furniture and apply it in thin coats, allowing each coat to dry completely before applying the next.
- Protective Coating: Applying a protective coating, such as polyurethane or varnish, helps to seal the wood and protect it from scratches, moisture, and stains. Choose a finish that is appropriate for the intended use of the drawers. Apply the coating in thin coats, allowing each coat to dry completely before applying the next.
Drawer Hardware
Drawer hardware includes knobs, pulls, and handles that are used to open and close drawers. These not only provide functionality but also add a decorative element to your cabinets.
- Knobs: Knobs are small, round or square pieces of hardware that are typically attached to the center of the drawer front. They are available in a wide range of styles, materials, and finishes.
- Pulls: Pulls are longer, rectangular pieces of hardware that are typically attached to the bottom or side of the drawer front. They offer a larger surface area for gripping, making them easier to open drawers. Pulls are also available in a wide range of styles, materials, and finishes.
- Handles: Handles are similar to pulls but are often shaped for a more comfortable grip. They are available in a variety of styles, including bar handles, cup pulls, and cabinet handles.
Installing Drawer Hardware
Installing drawer hardware securely and aesthetically is important for both functionality and appearance.
- Measure and Mark: Before drilling any holes, measure and mark the exact location for each piece of hardware on the drawer front. This ensures that the hardware is installed symmetrically and at the appropriate height.
- Pre-Drilling: Pre-drilling pilot holes before installing screws helps to prevent splitting the wood. Use a drill bit that is slightly smaller than the diameter of the screw.
- Secure Installation: Use the appropriate screws for your hardware and the thickness of your drawer front. Drive the screws in until they are snug but not overtightened. Overtightening can damage the wood or strip the screw threads.
- Alignment: Ensure that the hardware is aligned properly before securing it. If necessary, use a level to ensure that the hardware is installed straight.
Installation and Adjustment
The final stage of your DIY drawer project is installation and adjustment. This involves fitting the drawer box into the cabinet opening, securing it to the frame, and fine-tuning the drawer slides for smooth operation.
Installing the Drawer Box
Installing the drawer box into the cabinet is a straightforward process that requires precision and careful alignment.
- Position the Drawer Box: Carefully slide the drawer box into the cabinet opening, ensuring it sits flush with the cabinet front and back.
- Secure the Drawer Box: Most drawer boxes are secured using screws or clips that attach to the cabinet frame. Refer to your drawer slide instructions for specific attachment methods.
- Check for Alignment: Once the drawer box is secured, check for proper alignment. The drawer should open and close smoothly without binding or tilting.
Adjusting Drawer Slides, Diy cabinet drawers
Drawer slides are designed to provide smooth and effortless operation. However, slight adjustments may be needed to ensure proper function.
- Slide Adjustment: Most drawer slides have adjustment screws that allow you to fine-tune the drawer’s height and side-to-side alignment.
- Height Adjustment: Adjust the height screws on the drawer slides to ensure the drawer sits level within the cabinet opening.
- Side-to-Side Adjustment: Use the side-to-side adjustment screws to ensure the drawer slides smoothly without rubbing against the cabinet sides.
Troubleshooting Installation Problems
Sometimes, you may encounter issues during drawer installation. Here are some common problems and solutions:
- Drawer Binding: If the drawer binds or sticks, check for obstructions or misaligned drawer slides. Adjust the drawer slides or remove any obstructions.
- Drawer Tilting: If the drawer tilts when opening or closing, ensure the drawer box is properly secured to the cabinet frame and the drawer slides are aligned.
- Drawer Sagging: If the drawer sags in the middle, consider using stronger drawer slides or reinforcing the drawer box with additional supports.
Advanced Techniques

Taking your DIY cabinet drawer skills to the next level involves incorporating advanced techniques that enhance functionality, aesthetics, and durability. These techniques can transform your drawers from simple storage solutions into sophisticated and personalized elements within your kitchen or any other space.
Building Drawers with Soft-Close Mechanisms
Soft-close mechanisms provide a smooth and silent closing experience, preventing slamming and extending the lifespan of your drawers.
These mechanisms typically consist of a damper or hydraulic cylinder that slows down the drawer’s motion as it closes. This ensures a gentle and quiet closing action, protecting the drawer and its contents from damage.
Here are the steps involved in installing a soft-close mechanism:
- Choose the Right Mechanism: Select a soft-close mechanism that is compatible with your drawer slides and drawer size.
- Install the Mechanism: Follow the manufacturer’s instructions for attaching the soft-close mechanism to the drawer slides or drawer box.
- Test and Adjust: Once installed, test the drawer’s closing action and adjust the mechanism as needed to achieve the desired level of damping.
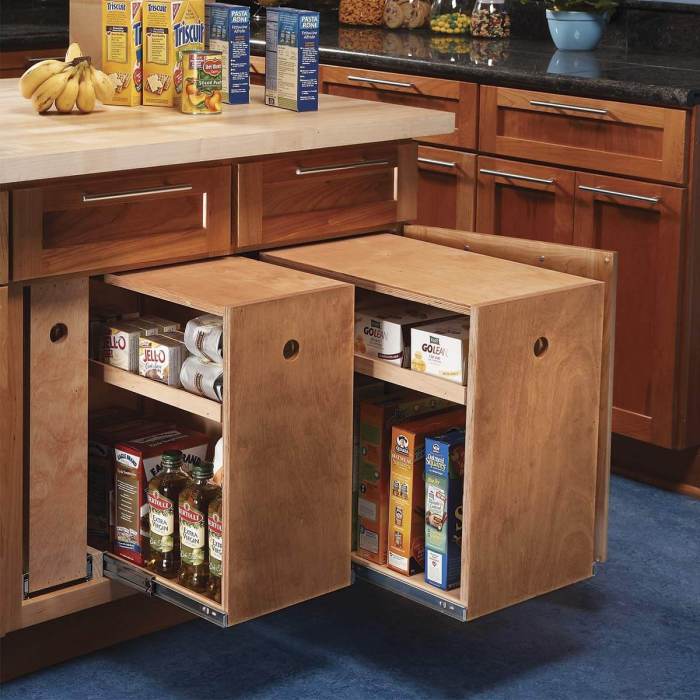
Incorporating Drawer Dividers
Drawer dividers create compartments within your drawers, allowing you to organize and separate different items. They help maintain order, prevent clutter, and maximize the use of drawer space.
- Materials: Drawer dividers can be made from various materials such as wood, plastic, or metal.
- Types: Dividers come in different configurations, including adjustable dividers, fixed dividers, and custom-cut dividers.
- Installation: Depending on the type of divider, installation may involve attaching them to the drawer sides, bottom, or using a track system.
Adding Decorative Elements
Decorative elements can enhance the visual appeal of your drawers, adding a touch of personality and style to your cabinets.
- Materials: Decorative elements can include wood carvings, metal accents, painted designs, or even fabric inserts.
- Placement: Decorative elements can be incorporated into the drawer front, sides, or even the drawer bottom.
- Customization: The possibilities are endless when it comes to decorative elements. You can choose elements that complement your existing cabinetry or create a unique and personalized design.
Safety Precautions

Working with power tools and woodworking materials can be rewarding, but it’s crucial to prioritize safety to prevent injuries. Always wear appropriate safety gear, follow proper tool operation procedures, and work in a well-ventilated area.
Personal Protective Equipment
Personal protective equipment (PPE) is essential for safeguarding yourself from potential hazards during woodworking.
- Safety Glasses: Protect your eyes from flying debris, sawdust, and wood chips. Choose glasses with side shields for added protection.
- Hearing Protection: Power tools generate loud noises that can damage your hearing over time. Wear earplugs or earmuffs to reduce noise levels.
- Dust Mask: Woodworking generates dust that can irritate your lungs and cause respiratory problems. Wear a dust mask rated for fine particles to filter out dust.
- Gloves: Protect your hands from splinters, cuts, and abrasions. Choose gloves that provide a good grip and are comfortable to wear.
- Work Boots: Provide stability and protect your feet from falling objects. Look for boots with steel toes for added protection.
Tool Operation Procedures
- Read the Manual: Before using any power tool, carefully read the manufacturer’s instructions and safety guidelines. Understand the tool’s functions, safety features, and potential hazards.
- Inspect the Tool: Before each use, check the tool for any damage, loose parts, or worn-out components. Replace or repair any defective parts immediately.
- Use the Right Tool for the Job: Choose the appropriate tool for the task at hand. Don’t use a tool for a purpose it was not designed for.
- Maintain a Firm Grip: Always maintain a secure grip on the tool and use both hands whenever possible. This helps prevent accidental releases and injuries.
- Keep Tools Sharp: Sharp tools are safer than dull ones. Dull tools require more force to use, increasing the risk of slips and accidents.
- Use Safety Guards: Use all safety guards and shields provided with the tool. Never remove or disable these guards.
- Avoid Distractions: When operating power tools, focus on the task at hand and avoid distractions. Put away your phone and clear the work area of any obstacles.
- Disconnect Power: Always unplug the tool before making adjustments, changing blades, or cleaning. Never work on a live tool.
Working in a Well-Ventilated Area
- Open Windows and Doors: Ensure adequate ventilation in your workspace to remove dust and fumes. Use exhaust fans if necessary.
- Use a Dust Collector: Connect your power tools to a dust collector to capture sawdust and prevent it from spreading throughout the air.
- Avoid Using Flammable Materials: Keep flammable liquids and materials away from your workspace to prevent fires.
- Store Tools Safely: When not in use, store tools in a safe and secure location, away from children and unauthorized access.
Inspiration and Ideas
The world of DIY cabinet drawers is brimming with possibilities. From sleek modern designs to rustic farmhouse aesthetics, there’s a style to suit every taste and home. Explore unique materials, innovative features, and inspiring examples to spark your creativity and find the perfect drawer for your project.
Modern and Minimalist Designs
Modern cabinet drawers often prioritize clean lines, simple shapes, and a minimalist aesthetic. These designs often feature sleek hardware, flush-mounted pulls, and a focus on functionality.
- Simple Box Construction: A straightforward approach using plywood or MDF panels for a streamlined look. Consider using edge banding for a polished finish.
- Integrated Handles: Eliminate traditional pulls by incorporating handles directly into the drawer front, creating a seamless design. This can be achieved with recessed grooves or angled edges.
- Soft-Close Slides: These slides provide a smooth and quiet closing experience, enhancing both functionality and aesthetics.
Rustic and Farmhouse Styles
Rustic and farmhouse designs embrace natural materials and a sense of warmth. Reclaimed wood, distressed finishes, and simple hardware are common elements in these styles.
- Reclaimed Wood: Incorporate salvaged wood for a unique character and a sustainable approach. Consider using reclaimed barnwood or old pallet wood.
- Distressed Finishes: Create a weathered look by sanding, staining, or applying a glaze to the drawer front. This adds a touch of rustic charm.
- Simple Hardware: Choose hardware that complements the rustic aesthetic, such as antique-style knobs or pulls. Consider using leather pulls for a touch of rustic elegance.
Unique Materials and Techniques
Step beyond traditional materials and explore innovative options for a truly unique look.
- Concrete: For a modern and industrial vibe, consider creating drawer fronts from concrete. This technique requires specialized molds and finishing techniques.
- Metal: Metal drawer fronts, such as those made from copper or stainless steel, offer a sleek and modern look. Consider incorporating metal accents into other design elements.
- Acrylic: Acrylic drawer fronts provide a transparent and contemporary look. They can be used alone or combined with other materials for a layered effect.
Innovative Features
Go beyond basic functionality and incorporate innovative features that enhance convenience and style.
- Hidden Storage: Create secret compartments or hidden drawers within larger drawers for storing small items or valuables.
- Dividers and Organizers: Install custom dividers or organizers to create designated spaces for different items, maximizing storage efficiency.
- Integrated Lighting: Add LED lights to the interior of the drawers for improved visibility and a touch of modern flair.
With careful planning, precision cuts, and a touch of creativity, building DIY cabinet drawers can be a fulfilling project. You’ll gain a sense of accomplishment from creating custom storage solutions that enhance your home’s functionality and style.
Building DIY cabinet drawers can be a rewarding project, but it requires precision and attention to detail. If you happen to have a skin condition like eczema, you might want to consider using tacrolimus ointment to keep your hands moisturized and protected while working with wood. Once your drawers are built, they’ll add a personalized touch to your kitchen or bathroom, and you’ll have the satisfaction of knowing you created something beautiful and functional with your own hands.