DIY fridge magnets offer a fun and creative way to personalize your kitchen and express your unique style. From whimsical designs to practical reminders, these magnets can transform a simple appliance into a reflection of your personality and interests. The possibilities are endless, with materials ranging from polymer clay and resin to wood and fabric, allowing you to explore various techniques and unleash your artistic flair.
Table of Contents
This guide delves into the world of DIY fridge magnets, providing step-by-step instructions, design inspiration, and practical tips for creating eye-catching and functional magnets. Whether you’re a seasoned crafter or a beginner, this comprehensive resource will equip you with the knowledge and confidence to embark on your own fridge magnet adventure.
Introduction to DIY Fridge Magnets

DIY fridge magnets are a fun and creative way to personalize your kitchen and express your individuality. They are also a great way to upcycle old materials and give them a new lease on life. The possibilities are endless, making them a popular choice for both beginners and experienced crafters.
Materials for DIY Fridge Magnets
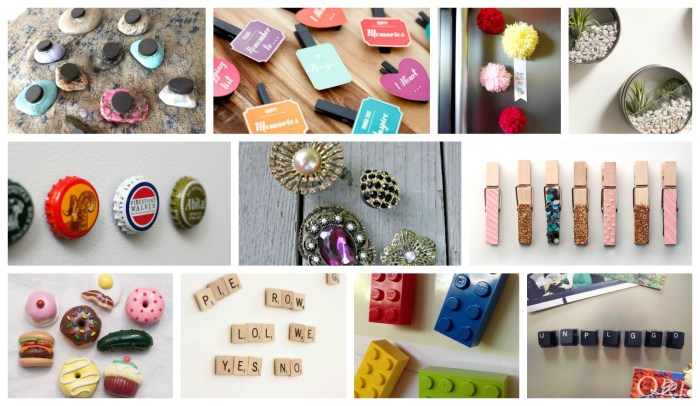
The materials used for creating fridge magnets are diverse, allowing for a wide range of styles and aesthetics.
- Ceramic tiles: These offer a smooth, durable surface for painting or decoupage. They can be easily found at craft stores or even salvaged from old projects.
- Polymer clay: This versatile material allows you to sculpt intricate designs and create three-dimensional magnets. It comes in a variety of colors and can be easily baked to harden.
- Wood: Small pieces of wood, such as dowels or wooden beads, can be used to create rustic or minimalist magnets. They can be painted, stained, or left natural.
- Resin: This clear material allows you to embed objects, such as flowers, glitter, or even photos, to create unique and eye-catching magnets.
- Cork: Cork is a lightweight and eco-friendly material that can be easily cut and shaped. It provides a natural and rustic look.
- Fabric scraps: Old fabric scraps can be used to create colorful and textured magnets. They can be sewn, glued, or even ironed onto a base material.
- Paper: Paper, including cardstock, scrapbook paper, and even old magazines, can be used to create vibrant and eye-catching magnets. They can be cut, layered, and embellished with markers, paint, or glitter.
- Plastic: Plastic bottle caps or other plastic pieces can be used to create colorful and unique magnets. They can be painted, decorated with markers, or even melted to create interesting textures.
Popular DIY Fridge Magnet Designs
DIY fridge magnets come in a wide variety of designs, reflecting personal interests and creative styles.
- Personalized magnets: These feature names, initials, or special dates. They are perfect for adding a personal touch to your kitchen.
- Seasonal magnets: These celebrate holidays and seasons with festive colors and designs. Examples include Christmas ornaments, Halloween pumpkins, or spring flowers.
- Travel magnets: These feature images of landmarks, souvenirs, or maps from your travels. They are a great way to remember your adventures.
- Nature-inspired magnets: These feature images of plants, animals, or natural landscapes. They bring a touch of the outdoors into your home.
- Abstract magnets: These feature geometric patterns, bold colors, or unique textures. They add a modern and artistic touch to your kitchen.
Techniques and Methods

Now that you have a basic understanding of what fridge magnets are and how they work, let’s dive into the fun part – creating your own! There are numerous techniques you can use to craft unique and personalized fridge magnets. We will explore some of the most popular and versatile methods, providing you with a comprehensive guide to get you started.
Sculpting
Sculpting is a great way to create three-dimensional fridge magnets with intricate details. You can use various materials, including polymer clay, air-dry clay, or even salt dough.
- Choose your material: Polymer clay is a popular choice due to its durability and versatility. Air-dry clay is a good option for beginners as it doesn’t require baking. Salt dough is a simple and inexpensive material that’s perfect for kids.
- Shape your design: Use your hands, sculpting tools, or even everyday objects to create your desired shape. Remember to leave a flat surface for attaching the magnet.
- Bake or air dry: If you’re using polymer clay, follow the manufacturer’s instructions for baking. Air-dry clay will harden on its own, usually within 24 hours.
- Paint and decorate: Once your sculpture is dry, you can paint it with acrylic paints, add glitter, or embellish it with other decorative elements.
- Attach the magnet: Use a strong adhesive to attach a magnet to the back of your sculpture.
Molding
Molding allows you to create multiple copies of your design, making it ideal for mass production or creating personalized gifts. Resin casting is a popular technique for molding.
- Create a mold: You can use silicone molds or create your own using materials like clay or plaster. Ensure your mold has a flat surface for attaching the magnet.
- Prepare the resin: Follow the manufacturer’s instructions for mixing the resin and hardener. Avoid bubbles by gently stirring the mixture.
- Pour the resin into the mold: Carefully pour the resin into the mold, ensuring it fills all the details. Let it cure according to the manufacturer’s instructions.
- Demold the resin: Once the resin is cured, carefully remove it from the mold. You can use a heat gun to help release the resin if needed.
- Paint and decorate: Decorate the resin piece as desired. Use acrylic paints, glitter, or other embellishments.
- Attach the magnet: Secure a strong magnet to the back of the resin piece using a suitable adhesive.
Decoupage
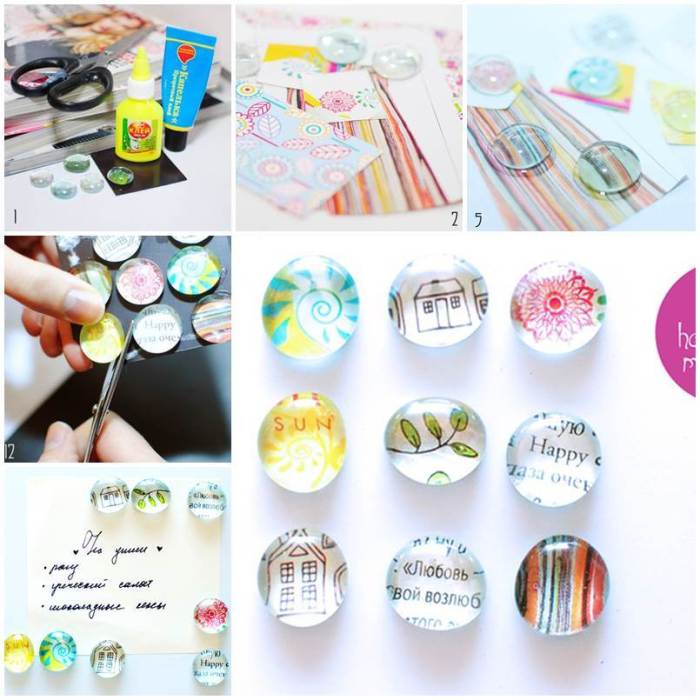
Decoupage is a technique that involves applying paper cutouts or images to a surface and sealing them with varnish. It’s a simple and versatile method for creating unique and personalized fridge magnets.
- Choose your base: You can use wooden squares, ceramic tiles, or even metal sheets as your base. Make sure the surface is smooth and clean.
- Select your images: Choose paper cutouts, magazine clippings, or printed images that you want to use for your magnets. You can also use decoupage paper, which is specifically designed for this technique.
- Cut and arrange your images: Carefully cut out your images and arrange them on your base. Use glue or decoupage medium to attach the images to the surface.
- Apply varnish: Once the glue is dry, apply a layer of decoupage varnish over the images. Let it dry completely before applying another layer. Repeat this process several times for a durable finish.
- Attach the magnet: Secure a strong magnet to the back of your decoupaged base using a suitable adhesive.
Painting
Painting is a classic and versatile technique that allows you to express your creativity and create visually appealing fridge magnets. You can use various painting techniques and mediums, from acrylics to watercolors.
- Prepare your surface: Choose a smooth and clean surface for your magnet. You can use ceramic tiles, metal sheets, or even wooden squares. Prime the surface with a suitable primer to ensure the paint adheres well.
- Choose your paints: Acrylic paints are a popular choice for fridge magnets as they dry quickly and are easy to use. You can also use watercolors, oil paints, or even markers.
- Paint your design: Use brushes, sponges, or other tools to apply the paint to your surface. Let your creativity flow and experiment with different techniques.
- Add details: Once the paint is dry, you can add details using fine-tipped brushes, markers, or glitter. Be creative and personalize your magnets.
- Attach the magnet: Use a strong adhesive to attach a magnet to the back of your painted surface.
Embroidery
Embroidery adds a touch of elegance and detail to your fridge magnets. You can create intricate designs using various embroidery stitches and threads.
DIY fridge magnets are a fun and easy way to personalize your kitchen. You can use anything from bottle caps to old buttons to create unique and eye-catching magnets. While you’re crafting, you might be interested in learning more about medications like zafirlukast , which is used to treat asthma. But back to the magnets, remember to use strong adhesive to ensure your creations stay put!
- Choose your fabric: Select a sturdy fabric that will hold up to embroidery. Felt, canvas, or even denim are good options.
- Transfer your design: Use a pencil or fabric marker to transfer your design onto the fabric. You can also use a lightbox or tracing paper to help you with this step.
- Embroider your design: Use embroidery floss or thread to stitch your design. Choose colors that complement your design and create visual interest.
- Finish your embroidery: Once your design is complete, secure the back of the fabric with a backing material like felt or cardboard.
- Attach the magnet: Use a strong adhesive to attach a magnet to the back of your embroidered fabric.
Troubleshooting and Tips
Creating DIY fridge magnets can be a fun and rewarding experience, but it’s not without its challenges. You might encounter some hiccups along the way, but don’t worry! With a little troubleshooting and a few handy tips, you can overcome any obstacles and create stunning magnets that you’ll be proud to display.
Addressing Common Challenges
When working with various materials and techniques, you might face some common challenges. Here are some troubleshooting tips to help you overcome them:
- Uneven Application of Adhesive: This can lead to uneven coverage and a less secure bond. To prevent this, ensure that the adhesive is applied evenly and smoothly. You can use a spatula or a credit card to spread the adhesive evenly across the surface.
- Uneven Magnet Placement: This can result in a magnet that doesn’t adhere properly to the fridge. To avoid this, carefully position the magnet before securing it with adhesive. You can use a ruler or a measuring tape to ensure that the magnet is placed in the desired location.
- Excess Adhesive: Excess adhesive can create a messy and uneven look. To avoid this, wipe away any excess adhesive with a clean cloth before it dries.
- Bubbles in Adhesive: Bubbles can appear when the adhesive is applied, creating an uneven and unattractive finish. To prevent bubbles, apply the adhesive slowly and gently. You can use a credit card or a spatula to smooth out any air bubbles.
Improving Magnet Strength
The strength of your DIY magnets can vary depending on the materials used and the techniques employed. Here are some tips for improving magnet strength:
- Use Strong Magnets: The strength of your magnets depends on the type of magnets you use. Choose strong magnets, such as neodymium magnets, for a secure hold.
- Increase Magnet Size: Larger magnets typically have a stronger magnetic force. If you need a stronger magnet, consider using a larger magnet.
- Proper Magnet Placement: The placement of the magnet is crucial for its strength. Ensure the magnet is positioned directly on the fridge surface, without any obstructions.
- Multiple Magnets: If you need a particularly strong magnet, consider using multiple magnets. This will increase the overall magnetic force.
Enhancing Durability
The durability of your DIY magnets can be affected by the materials and techniques used. Here are some tips for creating durable magnets:
- Choose Durable Materials: Use materials that are known for their durability, such as acrylic, wood, or metal.
- Secure Adhesive: Use a strong and durable adhesive that is designed for long-term use.
- Protect the Surface: Apply a protective coating to the surface of the magnet to prevent scratches and damage. This could include a sealant or a varnish.
- Avoid Harsh Environments: Keep your magnets away from extreme temperatures, moisture, and direct sunlight to ensure their longevity.
Refining Your Techniques
With practice and a little experimentation, you can refine your techniques and create even more impressive DIY magnets. Here are some tips for improving your results:
- Experiment with Different Materials: Don’t be afraid to try different materials and techniques. Experimenting can lead to unexpected and creative results.
- Practice Makes Perfect: The more you practice, the better you’ll become at creating DIY magnets. Don’t be discouraged by early attempts that aren’t perfect.
- Seek Inspiration: Look at other DIY projects and get inspiration from different techniques and materials.
- Share Your Creations: Share your DIY magnets with friends and family and get feedback on your creations.
Community and Inspiration
The world of DIY is all about sharing, learning, and inspiring each other. Your fridge magnet creations are not just about decorating your kitchen; they are a reflection of your creativity and a chance to connect with a vibrant community of fellow DIY enthusiasts.
Let’s explore the wonderful world of online communities and resources that can fuel your DIY passion and inspire your next fridge magnet project.
Online Communities and Resources
Joining online communities can be a fantastic way to connect with other DIYers, share your projects, get feedback, and discover new ideas. Here are some popular platforms and resources:
- Reddit: Reddit hosts numerous subreddits dedicated to DIY projects, including specific ones for crafts and home decor. You can find subreddits like r/DIY, r/crafts, and r/homedecor. These subreddits offer a vast library of projects, tips, and discussions. You can share your fridge magnet creations, ask for advice, and get inspired by others’ projects.
- Pinterest: Pinterest is a visual treasure trove of DIY ideas. You can search for “DIY fridge magnets” or “fridge magnet crafts” and find a plethora of inspirational projects, tutorials, and step-by-step guides. You can create your own boards to save your favorite ideas and organize your DIY journey.
- YouTube: YouTube is a fantastic resource for DIY tutorials and demonstrations. Search for “DIY fridge magnet tutorials” or “fridge magnet crafts” to discover a wide range of videos that guide you through different techniques and materials.
- Facebook Groups: Facebook hosts numerous groups dedicated to DIY, crafts, and home decor. These groups provide a platform for sharing your projects, asking questions, and engaging in discussions with other enthusiasts. You can find groups like “DIY Crafts,” “Home Decor DIY,” or “Fridge Magnet Ideas.”
Sharing Your Creations, Diy fridge magnets
Once you’ve created your own unique fridge magnets, don’t hesitate to share them with the world! Online platforms provide a great opportunity to showcase your creativity and inspire others:
- Social Media: Instagram, Facebook, and Twitter are excellent platforms to share your DIY projects. Use relevant hashtags like #DIYfridgemagnets, #fridgemagnetcrafts, or #handmadehome to connect with other DIYers and expand your reach.
- Online Marketplaces: Platforms like Etsy and Shopify allow you to sell your handmade creations, including fridge magnets. This can be a rewarding way to share your passion and potentially earn income from your crafting skills.
- Blogs and Websites: Consider starting your own blog or website to document your DIY journey, share your projects, and connect with a wider audience. You can write about your creative process, offer tips and tricks, and inspire others to embark on their own DIY adventures.
Crafting DIY fridge magnets is a rewarding experience that combines creativity, practicality, and personal expression. From selecting materials to refining techniques, each step allows you to infuse your unique style into every magnet you create. As you explore the endless possibilities of design and personalization, you’ll discover the joy of transforming ordinary objects into personalized works of art that add a touch of whimsy and charm to your everyday life.


